¶ 3D Printer Usage
Please read this page and follow the steps here when using the 3D Printers
3D printers transform filament into functional parts by feeding the material through an extruder into a heated nozzle. The molten filament is deposited in thin layers on the build plate and fused together to form the final object.
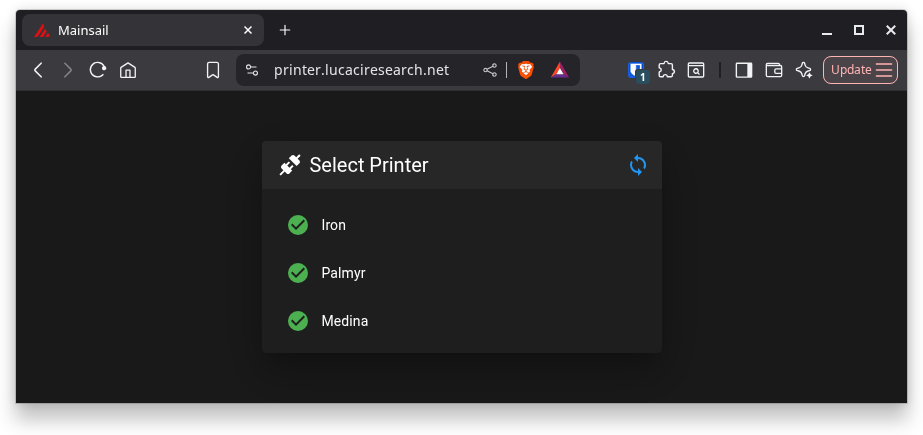
All our klipper-based printers can be accessed online over the printer portal located at printer.lucaciresearch.net. This URL can also be accessed from the Dashboard.
 |
|---|
| Medina | Palmyr | Iron | Envy | Malice | Supermodel | Kraftmaschine |
|---|---|---|---|---|---|---|
| Voron 2.4 3503 | Voron 2.4 3003 | Voron Zero 1203 | Prusa i3 MK3.5 | Prusa i3 MK3.5 (Down for maintenance) | DuelingZ | DuelingZ |
Please see in each printer's section below the correct name for printer and print profiles. Filament profiles are generally standardized and the slicer should not let you print with a non-compatible filament.
¶ Slicer setup
We use PrusaSlicer as our slicing software. On first launch, the slicer prompts you to select printer profiles. Do not select the team’s printers in this step, as we manage custom configurations separately (explained below).
¶ Updating your slicer configuration
Always update your slicer configuration to the latest version. The printers will reject G-code files generated with outdated configuration profiles.
- Download the newest configurations from our github repository. To download, press the green button and click
Download ZIP. - Extract the contents of the zip file in your PrusaSlicer's config folder. If asked, overwrite any files folders. The possible locations are outlined below:
- Linux:
~/.config/PrusaSlicer - Windows:
%APPDATA%\PrusaSlicer(Type this in your file explorer, it will open the right directory)
¶ Updating from old installs
If you are updating your existing installation and you have old profiles, always prefer to nuke the old configuration (delete the config folder outlined above).
If you need to keep some of your old configs, go to your config folder and identify all print, printer and filament profiles you wish to keep. Delete all other.
¶ Bed placement considerations
To reduce warping and lifting from the build plate, break complex geometry into smaller, simpler components whenever possible.
Keep massive, warpy parts off the edges of the buildplate. Because the edges of the buildplate are slightly colder than the center, putting warpy parts on the edge will cause the print fail.
Rounding corners also helps prevent warping.
| Example: large parts as close to the center |
|---|
 |
¶ Build plate
Each printer uses magnetic, hot-swappable build plates. Both sides of each plate can be used, but certain surfaces are better suited for specific materials (see below). When switching to a new build plate, follow the general checklist:
- The plate is correctly dimensioned for the printer.
- Prusa XL plates for Medina.
- Prusa Core One plates for Palmyr.
- Prusa Mini plates for Dueling.
- Wipe the plate with IPA
- Ensure correct positioning (example: for Palmyr the plate should not cross under the nozzle wiper)
- Check recommandations given in the materials section below.
The printers are usually equipped with a Satin sheet. This is the daily setup that we run and it should fit your workkflow too. The Satin has a few drawbacks, notably that is does not have that much holding power for our most usual materials (ABS, ASA, PC). Big parts can still warp and small parts can get knocked off during printing. In these cases, you might end up needing much stronger adhesion than Satin, in which cases please switch to the PEI Smooth sheet.
| PEI Smooth | Satin | Textured |
|---|---|---|
| Very good adhesion for a wide range of materials. Do NOT use with PETG or PC as it bonds permanently. |
Decent adhesion for almost all materials imaginable, including first-class support for PC. Insufficient adhesion with ABS for small or warpy parts. |
Good adhesion for PETG, but not really useful beyond that. |
Tree supports tipically do not succeed on the Satin sheet using ABS. This is because the bottom layer of the supports is fragile, and combined with the reduced adhesion, may cause the support to fly off the print. Prefer to use Snug supports or better, switch to the Smooth sheet
The Satin sheet does not provide excellent adhesion for large parts AND for parts with small contact bases.
If you need to print large parts, prefer to redesign so that the effects of warping are minimized. If that is not possible, the Smooth sheet can be used instead, but PLEASE let us know first.
The strong adhesion of the Smooth sheet combined with significant warping can permanently damage the sheet!After using the Smooth sheet, always revert to the Satin sheet.
¶ Material selection
Material compatibility depends on the printer type. As a general guideline:
- Enclosed printers only use ABS and ASA
- Open printers only use PLA and PETG
- HIPS can be used as support material on multi-material enclosed printers
- PC will be printed only on enclosed printers and after careful evaluation of the design. Due to severe adhesion and warping, it can damage PEI sheets. It is a good idea to print it on multimaterial printers (Palmyr) to allow for ABS strain relief features.
If a filament profile is not available in the slicer, it generally means that the selected printer is not compatible with it. If you need to print nonstandard setups, talk to us and we will figure out a way to make it work.
- ABS is very solid and heat-resistant. It holds up well under heavy load. Special care must be taken to prevent warping by careful design and placement on the buildplate. Additives can severely degrade the mechanical properties.
- Matte ABS (Everfil ABS-L.01 and ABS-M.34) has very poor layer adhesion and break resistance. Use only for decorative prints and some Voron printer parts.
- Regular ABS has good mechanical properties. This category includes 3DPower, Sakata3D, Everfil ABS-S.01 and other.
- White ABS is EXTREMELY brittle even in filament form. It is very abrasive to extruder gears and nozzles. The cause of this is the addition of TiO2 as a whitener. Do not print unless necessary. It can break in the extruder, in filament changers, in the tube or pretty much anywhere.
- Print on the regular Satin plate except for when printing parts that are susceptible to warp or are too small to keep adhesion during printing. For these cases, switch to PEI Smooth.
- Use Adhesion Relief on Smooth PEI.
- ASA is equivalent to ABS and is resistant to UV degradation. It rarely contains destructive additives.
- PC is literally ABS on steroids. Mechanical resistance is trough the roof, but it warps severely. It is dense and heavy.
- Print PC on the Satin sheet only after careful evaluation of the design with Alex or Cristi.
- Do NOT print on Smooth PEI as it will bond permanently.
- Use Adhesion Relief on Satin sheet.
- PCCF is PC with added carbon fibers that reduce the warping effect at the expense of worse layer adhesion and surface finish. Stiffness and dimensional stability is much improved. Careful considerations for:
- Print on Satin sheet or on Smooth sheet with the recommendation below.
- Minimize bed contact area by adding pocketing-like features on the bottom. Use strip width of 8mm and maximum bridge length of 30mm. This can allow you to print with Smooth sheet but take note that if the part warps, it will warp together with the bed, or destroy the bed coating.
- Do not expect smooth surface finish.
- Does not play well with filament changers (too stiff). Load manually.
- WILL eat right trough extruder gears and nozzles, so talk to Alex or Cristi before pulling the trigger on the print button.
- 0.6mm nozzle is strongly preffered to prevent the CF jamming.
- Most printers are not able to keep up with the required temperature on standard profiles and speed, so ensure to lower the speed until the extruder power does not cross 90% consistently. Start at 75% speed and increase if there is headroom.
- Use Adhesion Relief.
- ABS-CF is ABS with carbon fibers added. It is stiff, low-warp but a bit more brittle.
- It follows the general recommendations of PCCF except that it can be successfully printed on Smooth sheets without fear of damage.
- Use Adhesion Relief if part is very big.
- PETG is good for prototypes and decorative parts. It has low impact resistance but good printability.
- If not hit with impact, it will bend before failing. Impacts will cause it to crack instantly.
- Parts under load slowly get microfractures over time, without giving any signs of failure. At some point, they disintegrate into bits. Do not use for gears or moving assemblies.
- Print only on Prusa with the Textured sheet.
- PLA is for kids, we do not use it.
¶ Adhesion Relief
Sometimes you may be required to print on the Smooth PEI sheet big parts. The adhesion of ABS, ASA, PC, PCCF can be destructive for the sheet if the contact surface area is very large.
To prevent this from happening, for large objects, prefer to create a sort of pocketing feature, where only the edges of the model and significant features will touch the bed. The floating bridges should be about 2mm deep. This example below has a diameter of 280mm. The width of the touching edges is about 8-10mm and bridges are kept manageable at around maximum 30mm.
 |
|---|
¶ Cooling
This bit here is not yet implemented, please read but do not take seriously.
All of our printers share common filament profiles. Despite having different cooling performance, the fan commands are hijacked by a klipper macro that scales the needed fan around what are the printer's capabilities.
The fan scaling parameters can be changed using the TEST_FAN_TUNING macro. After tuning, don't forget to save the new values in the KlipperScripts/fan_scale.cfg file.
[gcode_macro TEST_FAN_TUNING]

# Test the scale and offset parametes of the overriden M106 fan macro.
# Also allows an override value to be set. If overridden, any value set on the fan
# will use the override value, except if 0 is set, 0 is written.
# Normal operation follows this formula: new_fan = (old_fan * SCALE) + OFFSET
#
#  P A R A M E T E R S :
# SCALE: float to scale the fan with
# OFFSET: float to add after scaling
# OVERRIDE: float to set as raw speed (no scaling and offset!).
#           Takes effect until this macro is called again *without* OVERRIDE.
#           If the macro is called parameterless, it just clears any active overrride.
#
¶ Spool management
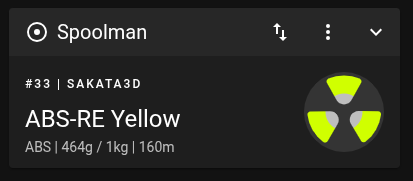
We use spoolman to track the filament usage. Spoolman can be accessed from the Dashboard or at spoolman.lucres.net All the klipper-equipped printers report to spoolman the used quantity of material.
Each spool is tracked using an unique number (example: #17) that is written using a marker on the spool or on the spool box. If opening a new spool, please take the time to transfer the writing from the box to the spool itself using a suitable permanent marker. Some spools will have a sticker that you can transfer to the spool.
 |
|---|
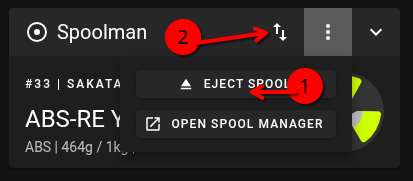
Before printing, ensure that you have enough filament on the spool. You can typically see this information inside the printer's page in the spoolman section. In this menu you can also eject the spool (1) (if using an untracked spool) or change the spool to another (2).
 |
 |
|---|
Always change the spool configured in the printer when switching spools. If you forget, the printer will keep consuming from the old one and we'll end up with bad data in spoolman.
It is possible to correct this situation by weighing all the affected spools manually and entering the data into spoolman. Ask Cristi or Alex to help with this operation.
You might get an error similar to
Cannot reach spoolman instance. This is because you might not be logged in to the spoolman instance in a long while. To fix it, open the Spoolman URL and then refresh the printer page.
¶ Palmyr integration
Palmyr has a different way to integrate with spoolman. Because there are up to 8 gates/spools, we cannot use the usual spoolman panel to set the filament. If we still use the regular panel and/or macros, the spool will remnain set only until the next load/unload happens, when the data is overriden and lost.
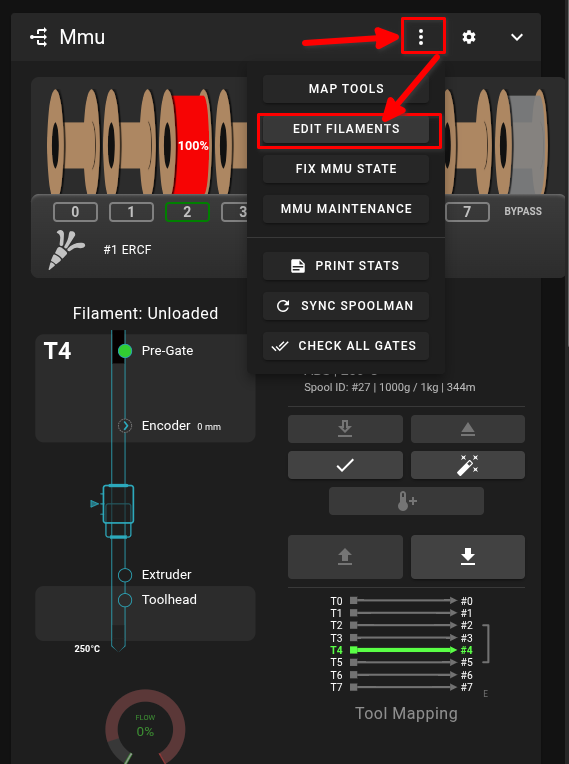
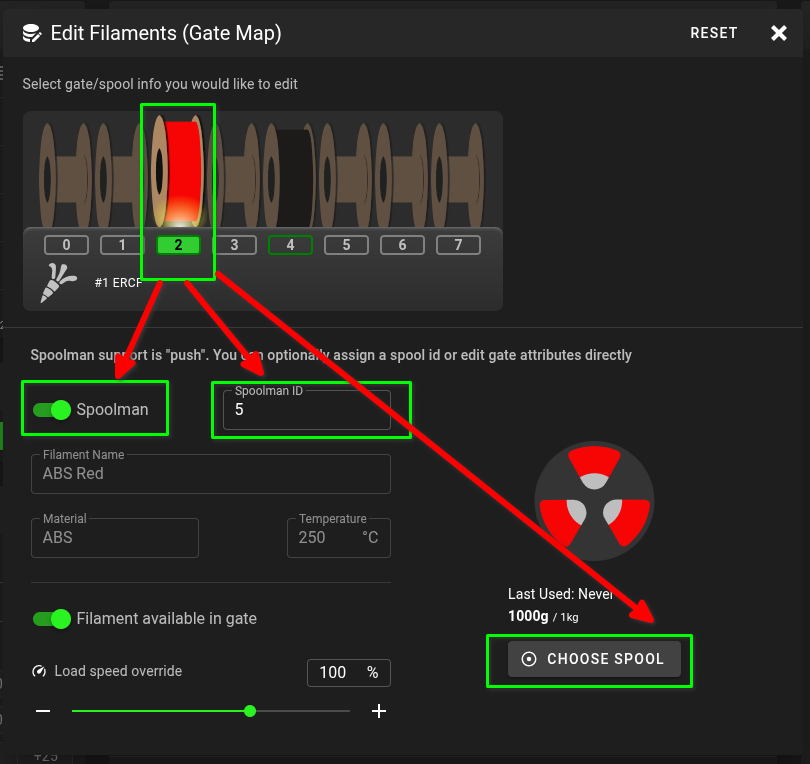
Palmyr keeps track of spool ID's inside its gate map. To modify the gate map, follow the instructions below:
| Locate the MMU panel and open the Edit Filaments menu inside the dots button | Click on the gate you wish to modify and enable Spoolman. Type the spool ID or click the Choose Spool button to have it auto-filled. To remove a gate from filament tracking, just disable Spoolman from that gate. |
|---|---|
 |
 |
The printer will fetch filament's details from spoolman like type, name and color. At each filament switch, the printer will set the appropiate spool ID and Moonraker will submit filament consumption to Spoolman. Selecting a gate will not change the current spool, only load operations.
¶ Pre-flight checks
Before printing, please have a look at the printer to ensure that it is operating normally.
- The printer's mechanics do not look damaged, bent or broken
- There is filament loaded and it is the same type of filament as in the slicer.
- The filament is compatible with the printer
- The print sheet is compatible with the material, respects the considerations outlined in the material section
- The print sheet has been cleaned with Isopropanol.
When in doubt, PLEASE ask Alex to help figure the issue out.
¶ Medina (Voron 2.4 3503)
- Printer profile:
Medina 4NZ - Print profiles:
Medina 4NZ 2LH Conservative Lighterhas normal speeds and few perimeters. It is best used to save filament and print time.Medina 4NZ 2LH Conservative Stronghas normal speeds and lots of perimeters. It eats more filament but produces strong parts.
Medina is a large format, enclosed Voron 2.4 printer. It only uses ABS and ASA.
The print sheet to be used is the PrusaXL Satin sheet. It can be switched to PrusaXL Smooth PEI if following the reccomandations from the filament section.
Currently, when loading filament, you have to disconnect the bowden tube from the extruder to manually feed the filament inside the gears. The reason for this process is that the extruder body has burrs from CNC machining and feeding from the tube will cause filament to get stuck.
To control the printer, use the webpage or the klipperscreen terminal.
¶ Palmyr (Voron 2.4 3003) with ERCF
- Printer profile:
Palmyr 4NZ ERCF - Print profiles:
Palmyr 4NZ 2LH Voron Standardhas the usual configurations for printing parts for Vorons (0.4mm forced extrusion width, many perimeters, high infill).Palmyr 4NZ 2LH Stronghas normal speeds and lots of perimeters. Use this one for general printing.
Palmyr genrally uses the same considerations as Medina for printing surfaces. The sheets are the same size as the Prusa Core One.
It is equipped with ERCF filament switcher. We will complete this section in the future with a small guide to use the filament switcher.
¶ Iron (Voron 0.2 1203)
- Printer profile:
Iron 4NZ - Print profiles:
Iron 4NZ 2LH Conservative Stronghas regular speeds and lots of perimeters and relatively high accelerations.
Iron is a good printer for rapid prototyping of not too big parts. The bed sheet is Smooth PEI, but because of the small size, it is not required to take special considerations when printing PEI-unsafe materials.
Currently, cooling is not very uniform and overhang performance is unsatisfactory.
¶ Prusa Mk3.5S
- Printer profile:
MK35 4NZ - Print profiles:
Prusa Mk3S+ are the 3D printers that our team has used since 2021 and they have been the most helpful tools for building our robots across the years, allowing us to bring our components and designs into reality. They were bought in the form of kits directly from Prusa and were built by our team with the help of the very user-friendly assembly manual. The assembly manual can also be used when doing teardowns of the printers to fix any issues, alongside other instructions and suggestions from the support page.
In 2026 we chose to upgrade our Prusa Mk3S+ printers to the Prusa Mk3.5S model, using upgrade kits bought from Prusa, and were assembled by our team using the very user-friendly upgrade manual.
The Prusa Mk3.5S upgrade gives us access to more modern features, such as input shaper, a new screen interface with USB support and printing over network, while maintaining most of the hardware used by the Prusa Mk3S+. These features make the printers run faster than ever while having a more user-accesible interface, helps us print pieces faster and easier than before.
The bed sheets attach magnetically to the bed and can be changed with our other sheets stored near the printers. For more information about the materials that can be printed on Prusa Sheets, you can consult Prusa’s Material Guide.
We print PLA on the smooth sheet and PETG on the textured sheet.
For more general information about the Prusa Mk3.5S printers you can consult the printer's handbook or read the physical versions present at the workshop, stored near the printers themselves.
To print, remove the printer's USB stick and conect it to the workshop's PC, upload your gcode file on the USB stick and insert the USB stick back into the printer. Press the "Print" button on the printer's LCD screen, select the file you uploaded and start printing.
¶ Printer Errors
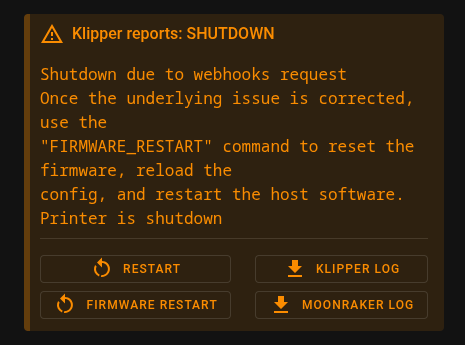
When the printer detects a malfunction, an error is thrown and the print is interrupted. When this situation happens, you will see an error box on the printer page like below:
 |
|---|
When this happens, PLEASE notify us on Mechanich channels before pressing the FIRMWARE RESTART button. Include all the relevant details of the error, so that we can debug the issue later on. It's important to know which is the reported problem.
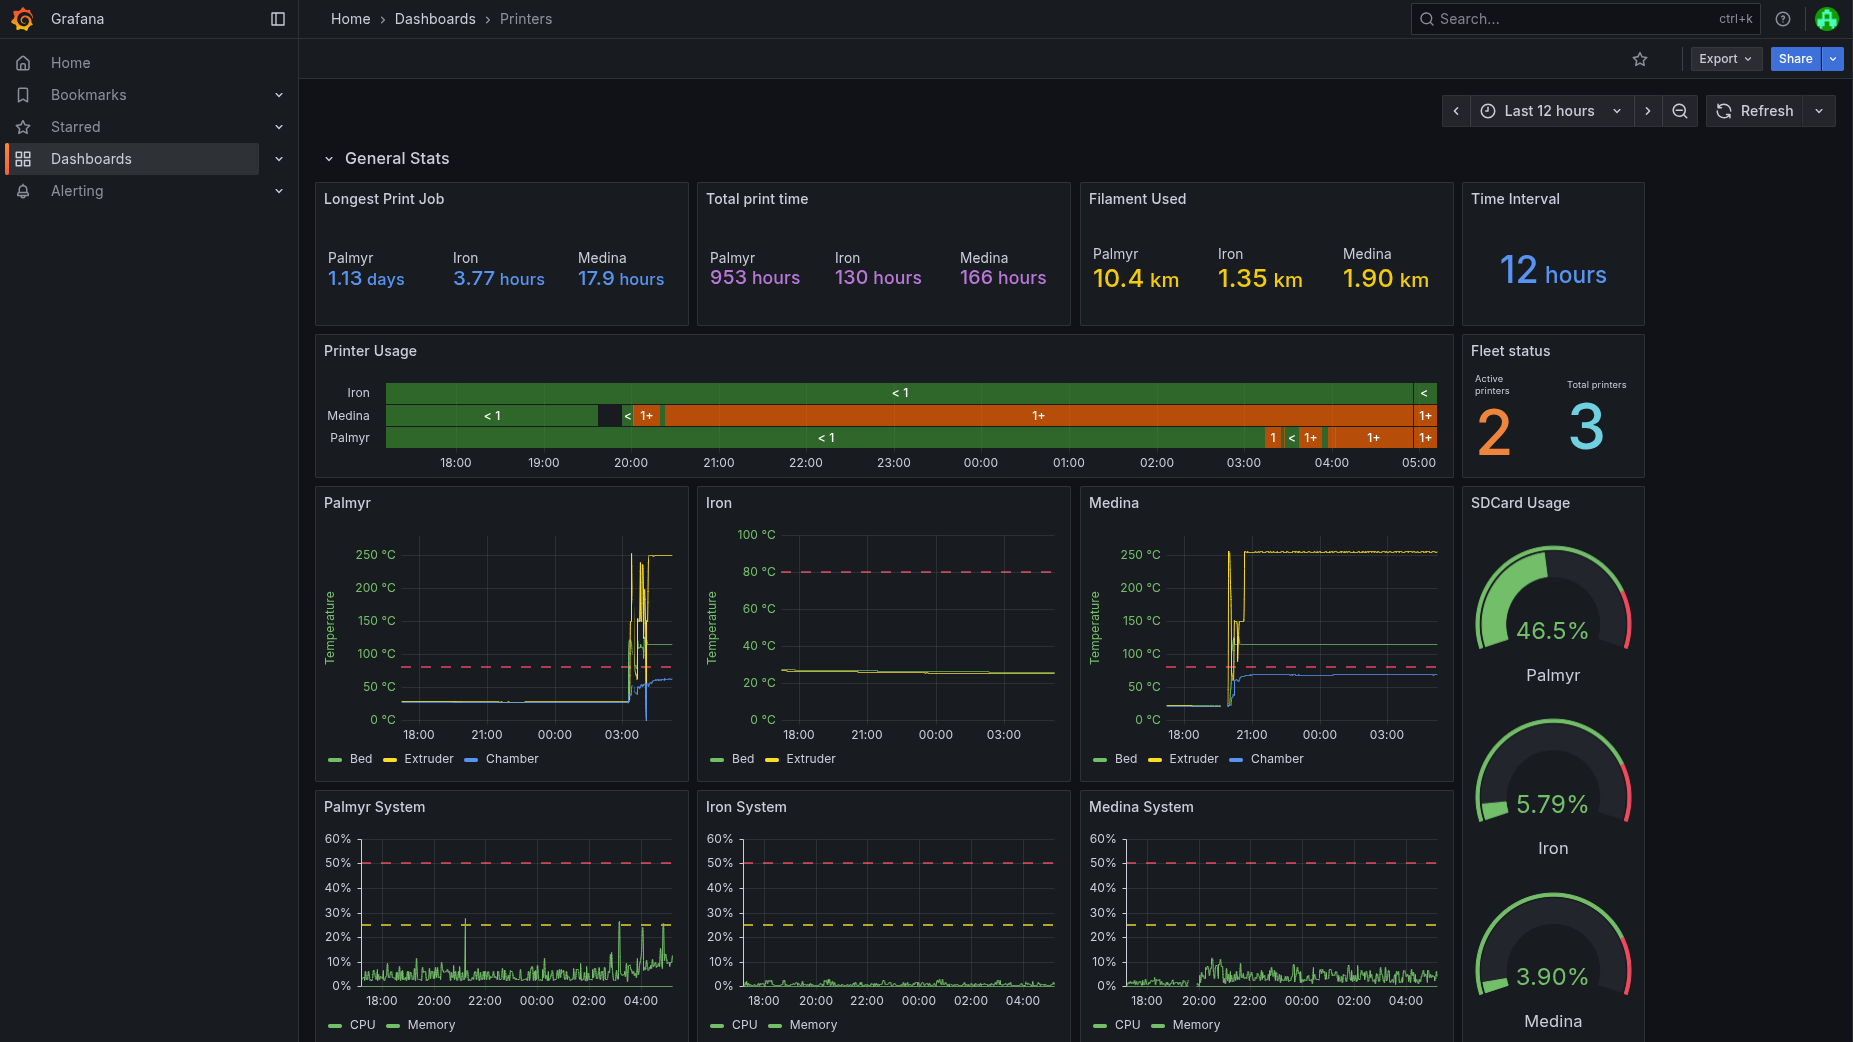
¶ Observability
All Klipper printers are connected to a data collection system called Prometheus. To view the status of the fleet, access the Grafana application from the Dashboard. When you open Grafana from the Dashboard, you should be automatically logged in.
Grafana is a tool that can create visualisations from any given data. It is able to read data from Prometheus, SQL databases, time series databases, log collection systems like Loki and more.
We use Grafana to create fancy graphs
After you open Grafana, you will see an empty welcome page. In the left menu, go to Dashboards then select the Printers dashboard. You will see a page with overview of the fleet status.
Full history is available for analysys in Grafana. Select your time interval in the top-right box and all charts will update. You can also drag on a graph to zoom in on a time interval.
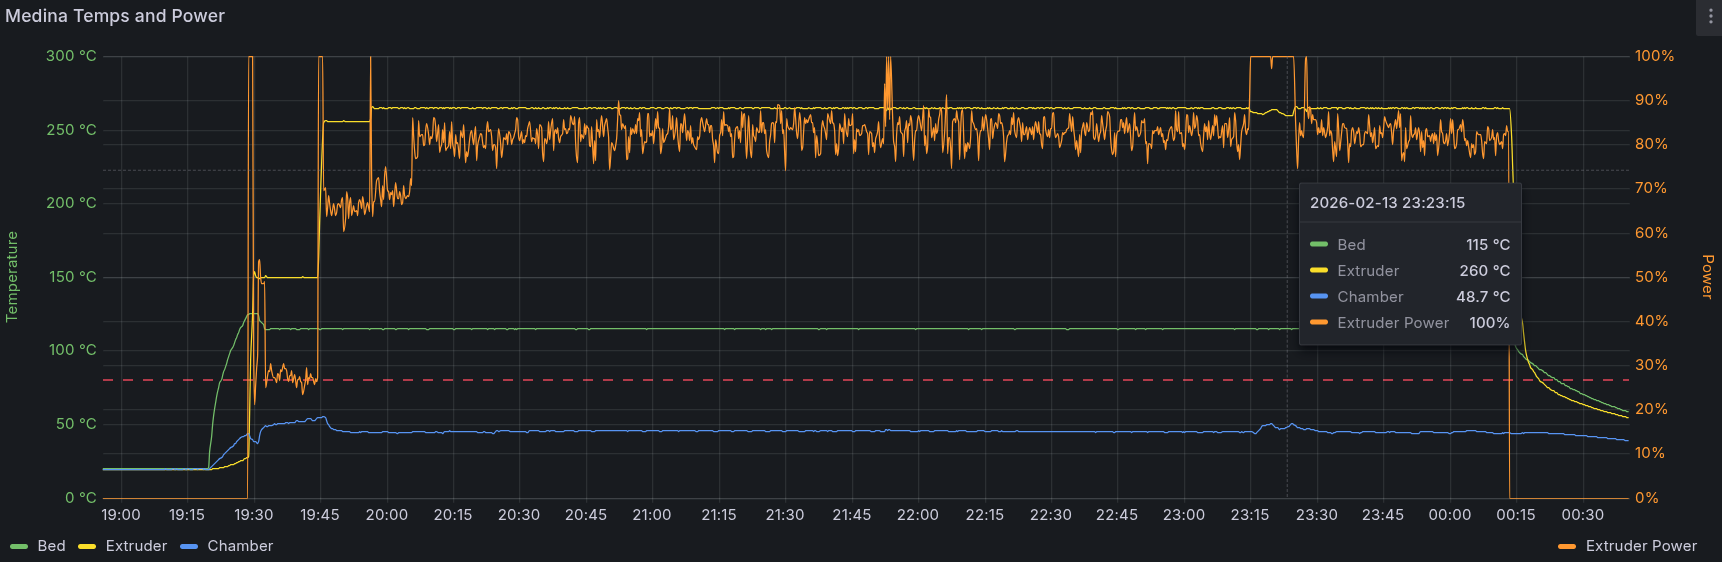
¶ Using Grafana to investigate errors
It is possible to use the grafana's history of temperatures to investigate different situations regarding heater issues.
In the graph below we can see that at some point in the print, the extruder temperature sagged a bit. We can also see the power field maxxing (touching the top of the graph). This indicates that the heater was not able to keep up with the required temperature due to unexpected cooling events. Possible causes are:
- Too much cooling for localized features (for example, bridges, overhangs). Cooling looks OK for general cooling as there is no sag for the entirety of the print. The power averages around 80%, which is high, but acceptable.
- Silicone sock is damaged and normal cooling for bridges overpower the extruder's heating ability.
We can also see a slight increase in chamber temperatures at that point, possibly meaning power dissipation indeed rises, caused by cooling and mis-isolation. Average power at 80% also tells us that it would be ideal to replace the heater with a bigger one.
 |
|---|
¶ Extruder Multiplier Calibration
Create a 55mm x 30mm x 55mm (Z) cube in the slicer. Do the following settings:
- Layer height: 0.2mm
- Bottom layers: 3
- Top layers: 269
- Infill: Gyroid, 15%
- Perimeters: 3
- Filament Extrusion Multiplier: 1
- Fill pattern: Archimedean chords
TODOChange process to use archimedean chords like in orcaslicer.
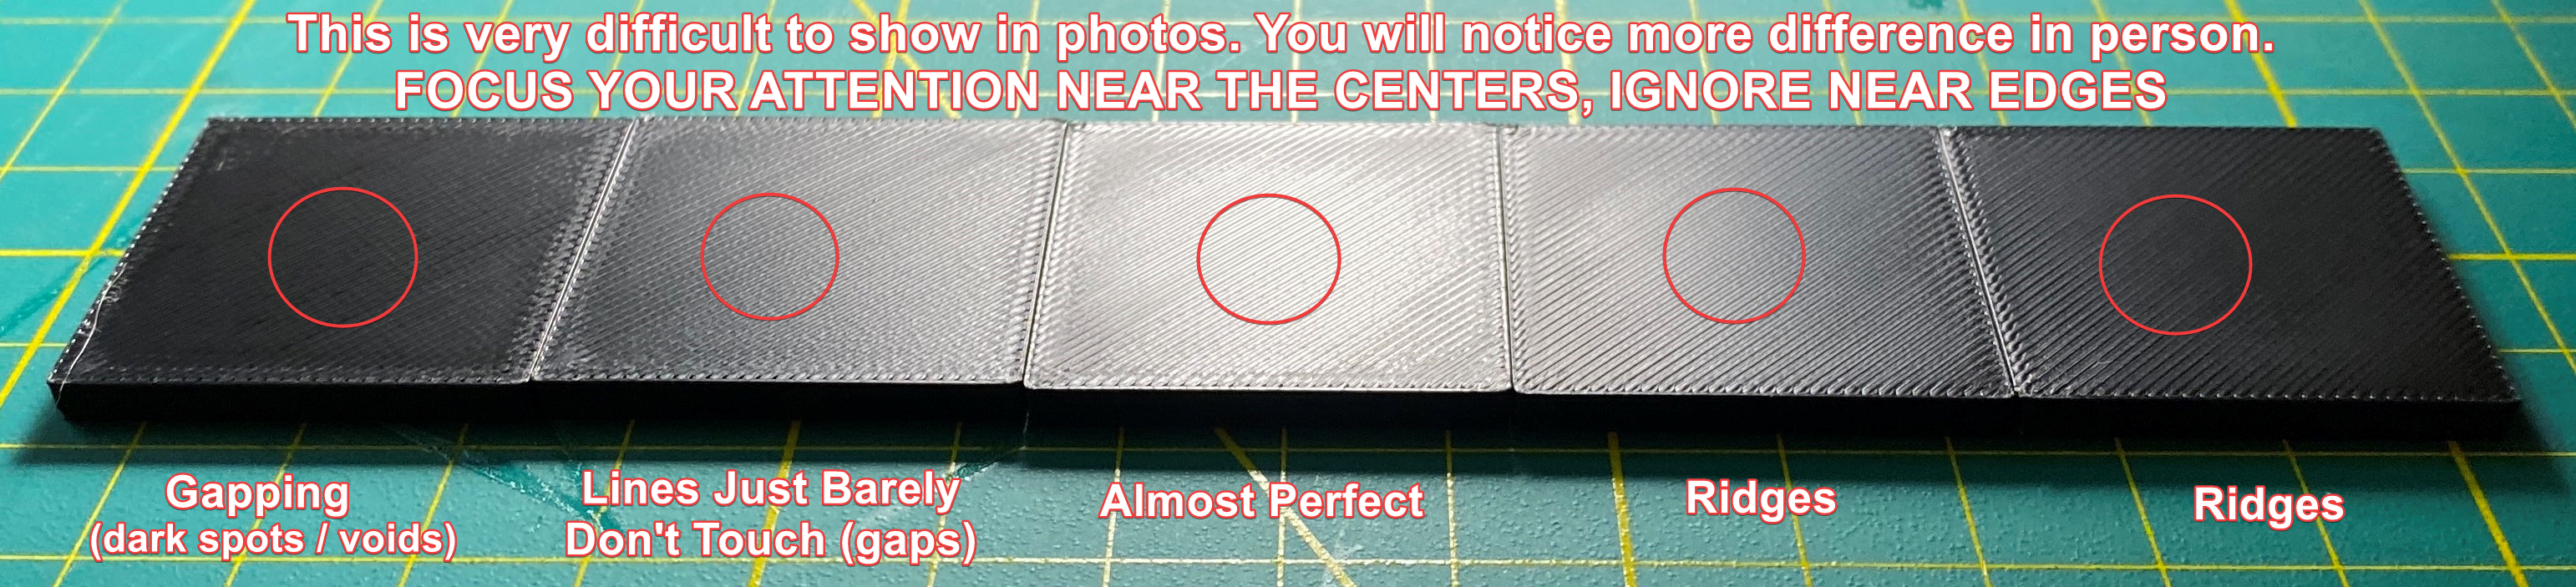
Print the cube. After it has finished doing infill layers, lower the EM until there are gaps between the lines. Then, slowly raise it, waiting 5-6 layers between each change. When the EM is too much, you will start to see extra filament buildup on the layers.
Perfect EM will have a nice finish of fused lines at the center of the surface. Disregard the edges where material builds up because of movement changes.
¶ Calibrating the rotation_distance printer (hardware) value
Do the sequence above with the REFERENCE ABS roll loaded. This roll is a blue Everfil filament that is only used for reference calibration across printers. To save the value, go to the printer configuration and replace the value of rotation_distance with the new calculated value by this formula:
rotation_distance = rotation_distance * 100 / EM
¶ Calibrating the extrusion multiplier slicer value
To be able to obtain accurate values from this test, the printer's rotation_distance should be calibrated first.
This process should be done with every type and brand of filament we own. Save the value in the slicer's filament extrusion multiplier setting (scale 0-100% to 0-1).
¶ Reference
¶ Printing small details
If printing very small details (like teethed pulleys), apply the following settings to print:
- Layers and Perimeters -> Perimeter generator: Classic
- Layers and Perimeters -> External perimeters first: True
- Speed -> Scale back speeds to not be over 100mm/s.
- Speed -> Acceleration control -> Default: 1000, set all other accelerations to 0.
Optionally, if there is enough headroom on the extruder heater power (see section above), the fan power for regular layers can be increased by approximately how much heater power headroom is available during print.
In some cases, bridge fan speed can also be increased after careful evaluation of past print data. Ensure the heater has enough headroom during intense cooling of bridges.
¶ Slicer profile mapping
PrusaSlicer includes features to restrict filament and printer profilese to a specific set of printers.
Set default filament and print profiles by opening the printer file and change these lines:
default_filament_profile = "Prusament PLA @MK3.5"
default_print_profile = 0.20mm SPEED @MK3.5 0.4
Configure for each printer a model.
printer_model = CVoron24
printer_model = CVoron24-ERCF
printer_model = CVoron0
printer_model = CMK35
Configure for each material what printers can use it. Restrict based on cooling performance, temperature compatibility and extruder type. If the filament is specific for a single printer, please prefix the filament name with the printer's name (not the printer_model above) and restrict it properly.
compatible_printers_condition = printer_model=="CVoron24" or printer_model=="CVoron0"
For filament compatibility, restrict based on compatible printers and nozzle diameter.
Take into consideration multimaterial handling.
compatible_printers_condition = printer_model=="CVoron24" and nozzle_diameter[0]==0.4
¶ Special maintenance
¶ Printer cleanup
All Vorons have a tendancy to accumulate plastic bits at the bottom, so make sure to remove them often. You can use a vacuum cleaner for this task.
¶ Palmyr Blobifier tray
After quite a few filament loads and unloads, the blobifier tray will fill up with purged blobs. Simply take it out by pulling the tab on the left towards the front and empty inside a trashcan.
¶ Palmyr ERCF servo startup
Due to unusual behaviour of the Axon servo at startup, it will vibrate aggressively until it is commanded to go to a position.
If you hear it vibrate after bootup, go to the ERCF menu, the Manage submenu and order to servo to go to the Move or Up position.
¶ Palmyr ERCF servo horn
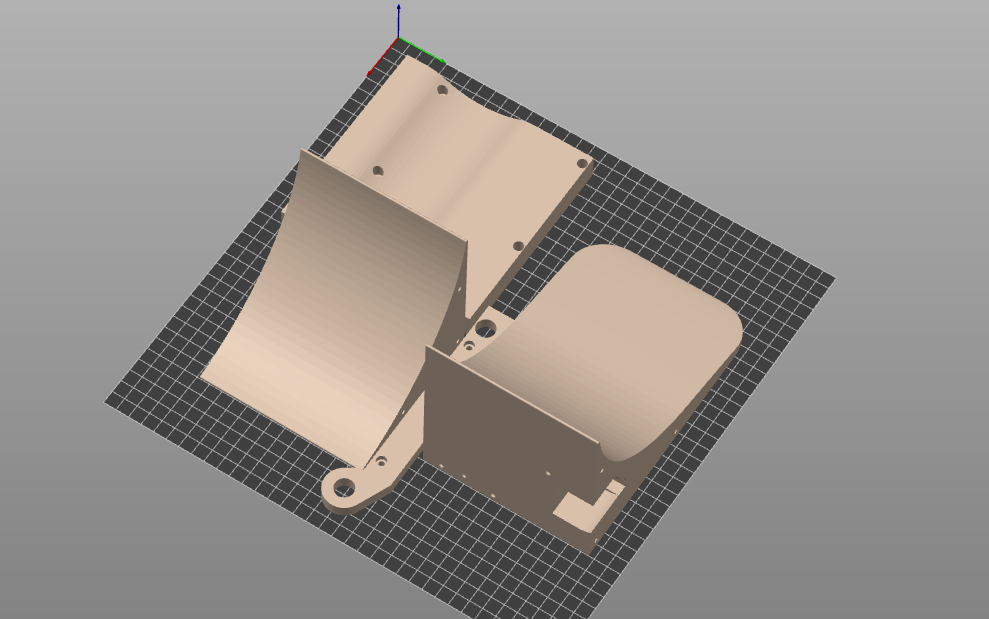
If the loading of material starts behaving eratically and does not have enough grip, it is very possible that the servo horn is worn out.
Print this servo horn. The screw at the center is nonstandard, so make sure to not strip it and keep it safe during the repair.
¶ Shortcuts
Conversion between filament units:
- 1 mm = 2.4 mm3
- 1 mm3 = 0.415 mm